I recently replayed the excellent Portal 2 by Valve. One of my favorite things in the game are the automatic robotic sentry turrets. The contrast of their cutesy voices with the fact that they fire machine guns at you on sight makes them a core part of the gallows humor present in the Portal series of games. As I played through the game, I realized that a lot of the voice cues trigger on events that are similar to another robot closer to home - the iRobot Roomba robotic vacuum cleaner. I decided I had to find a way to combine these two things!
Goals
I focused on three specific categories of action the turrets respond to in game: collisions, detection of the player, and being picked up with the portal gun. These translate nicely to some common actions of the Roomba: bumping into walls to navigate, detecting dirty spots on the carpet, and recognizing when it has been picked up (or is about to fall down the stairs) and shut off. With these actions identified, the next step was to figure out how to get this information from the Roomba, process it, and play the appropriate sounds.
The Roomba Hardware
First lets talk about the Roomba hardware. Some of the newer, fancier Roombas have WiFi and infrared capability, but I have a Roomba 561 which has none of these. Initially I thought I’d have to do some serious surgery to get access to the Roomba’s sensors, but then I discovered the Roomba SCI (Serial Command Interface). It turns out that iRobot put a serial port on the Roomba and published a detailed specification that describes how to talk to it. This is awesome. It really opens up the robot to a whole bunch of possibilities beyond just vacuuming a room.
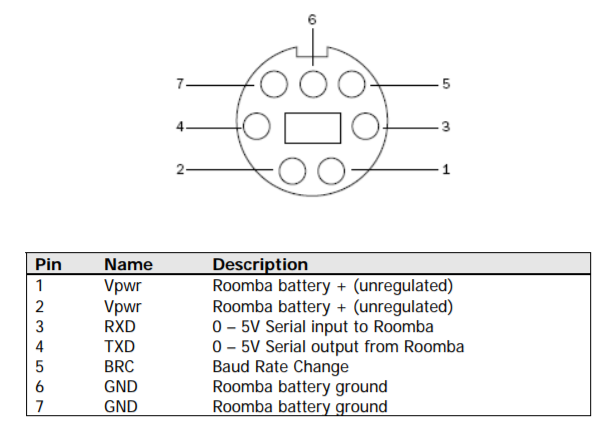 Roomba SCI DIN port pinout
After reading the spec, I learned that the Roomba is equipped with many sensors for navigation and cleaning. For this project I focused on what iRobot calls bump sensors, cliff sensors, wheel drop sensors, and dirt detect sensors. The bump sensors, two on the left and right, are big glorified buttons that are activated when the Roomba hits an obstacle. The cliff sensors are a set of four infrared proximity sensors that check whether the boundaries of the chassis are close to the ground. The wheel drop sensors detect whether the spring loaded wheels are both on the ground. Finally, the dirt detect sensors are cool piezoelectric sensors that make use of a crystal oscillator to detect particularly dirty spots on the floor.
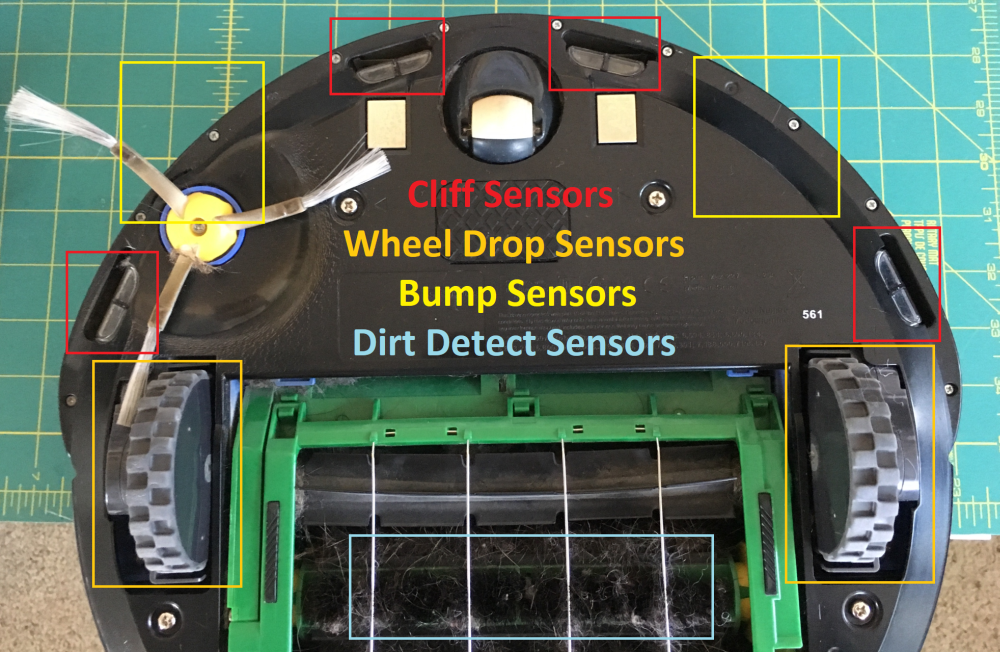 Sensors on bottom of Roomba
The Roomba SCI interface provides a documented way to get the states of all these sensors. Since this project is just observing the sensors and playing audio, there’s no need to worry about sending anything back to the Roomba. A simple loop that polls the sensor state is all that is required. One note: I did also investigate using the Roomba’s built in speaker for playing the turret audio. However although the SCI interface provides a comprehensive method of composing tunes (you send the interface specific musical notes and durations and a melody plays), there’s no way to pipe in something like an audio file.
The “Brain” Hardware and Software
Now that I had a decent handle on how the Roomba internals work, it was time to figure out what to use as a brain. I settled on using a Next Thing Co. C.H.I.P. because I also had one laying around. This is a very similar device to the vastly more popular Raspberry Pi. I actually got my C.H.I.P. on Kickstarter, but unfortunately it seems like the company has gone under and C.H.I.P.s are no longer available. If you’re looking at repeating the project here on your own Roomba, it should be pretty easy to adapt the code to work on the Pi.
In terms of the code, I ended up leveraging PyRoomba which is a basic Python implementation of the Roomba SCI interface. I experimented with this library which I think was written for an even older version of the Roomba than I have. After I changed the output serial device in the code to match the hardware in the C.H.I.P. and bumped up the baud rate to work with my Roomba things started working. I was able to poll the sensor data rapidly enough to detect any changes in sensor state almost instantaneously.
Once I had the sensor data streaming, I wrote a simple function to pick a random audio file out of a folder for each category of action and called the aplay command line audio playback application on Linux on the file. Simple, but effective!
Get the PortalRoomba code on GitHub!
Testing
Now it was time to test everything. In this configuration I wired everything all up on my big prototyping breadboard. The C.H.I.P. is getting power from the wall in this configuration. Okay for testing, but ideally the Roomba should be providing power from its built in battery. One other thing to note here is that the Roomba uses TTL voltage levels (5V) for the serial connection. I had to adapt this to 3.3V to talk to the C.H.I.P. I read that even though the Roomba specifies 5V for its input (RXD) it will work just fine on 3.3V so i just wired that in directly. For the output from the Roomba (TXD) I created a simple voltage divider using a couple of resistors to bring the 5V down to ~3.3V. Electrical engineering 101!
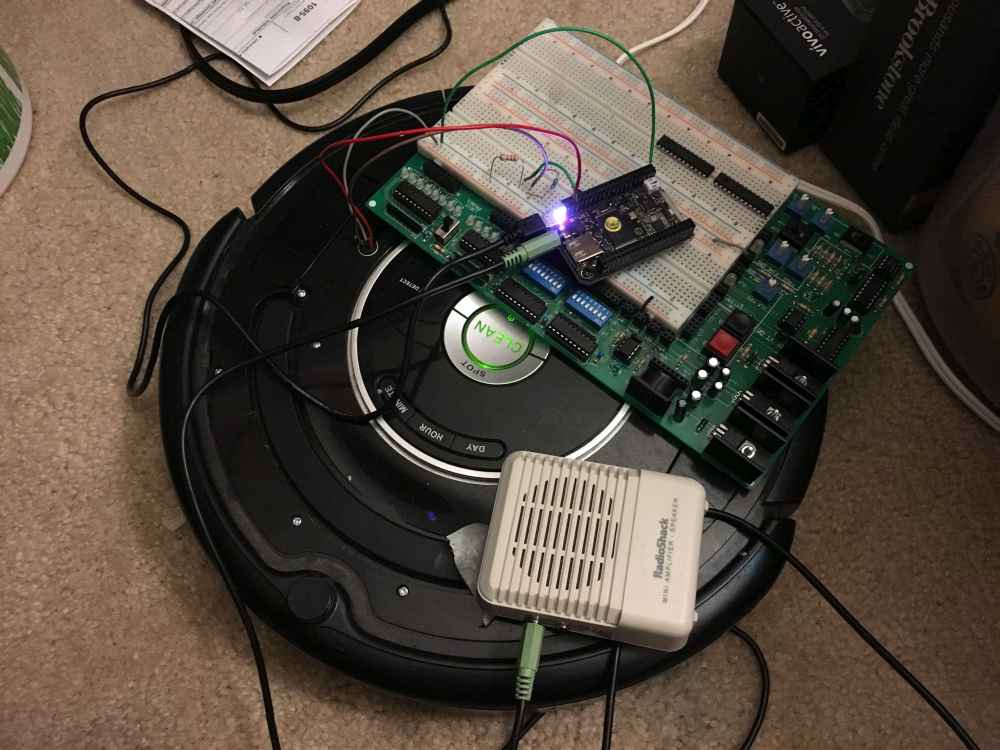 Testing configuration
Making the Package Mobile
The Roomba SCI port provides a direct line into the unregulated Roomba battery voltage which is ~14.4V DC. This is way too much for the C.H.I.P. so I wired in a UBEC (universal battery elimination circuit). I have a bunch of these I bought for a quadcopter project and I love them. They efficiently bring an input voltage up to 32V down to a user selectable 5V or 6V. They’re a little more expensive than a linear regulator (like my big breadboard uses) but they generate much less waste heat. Switching to the UBEC and mini-breadboard got the whole package small enough to sit on top of the Roomba. All that was left to do was plug in a basic speaker to the 3.5" audio jack on the C.H.I.P.
 Final configuration
Video Demonstration
Here’s a demo of whole package in action!
Resources
Roomba 500 Open Interface Spec (PDF)
>> Home